Going fishing for the first time involves more decisions than most beginners expect – the licence, the venue, the tackle, the bait. Getting any of these wrong wastes a session or, worse, results in being turned away from a fishery. This checklist covers everything in the right order.
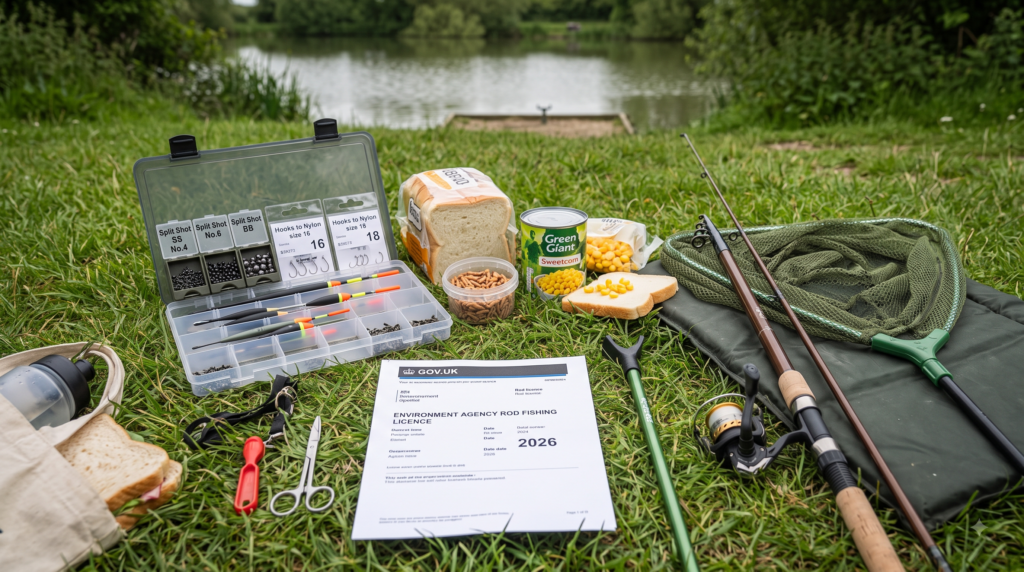
Before You Go: The Legal Essentials
1. Get a Rod Licence
A rod licence from the Environment Agency is legally required for anyone aged 13 and over fishing in England and Wales. You cannot fish without one.
How to get it: Apply online at gov.uk/fishing-licences. The licence is issued digitally (no physical card). Print it or screenshot it to your phone before you fish – you may be asked to show it on the bank by a Fishing Enforcement Officer.
Cost (2026 rates): Check the government website for current pricing. Annual, 8-day, and 1-day options are available. A 1-day licence is the cheapest option for a first session to see if fishing is something you want to continue.
Under 13: No licence required in England and Wales.
13-16: A free junior licence is required. Apply at gov.uk/fishing-licences.
Scotland: No national rod licence is required for freshwater fishing. The landowner’s permission (typically a day ticket) is required.
2. Get Permission to Fish the Water
A rod licence gives you the legal right to fish in England and Wales. A day ticket (or membership of the club that owns the water) gives you the permission of the fishery owner to fish that specific water. Both are required at most venues.
Commercial day ticket fisheries: Pay at the fishery office or cabin on arrival. Many also sell tickets online. Prices vary from £5-15 for a half or full day.
Club waters: Annual membership through local angling associations. Not suitable for a first session; use a commercial fishery.
Free fishing: Some short stretches of river and some CaRT canal lengths are available without a day ticket. These are less predictable for beginners – fish stocks and access can be variable.
Best option for a first session: A commercial carp or mixed coarse fishery with a bailiff on site, good car parking, bank access, toilets, and regular stocking. Look for waters that advertise specifically as beginner or family friendly.
Tackle Checklist
You do not need expensive tackle for a first session. The list below is what actually covers you for a day’s float fishing on a commercial stillwater.
Rod and Reel
- Rod: A 12-13ft float rod or waggler rod. Alternatively, a beginner starter kit from a tackle shop provides rod, reel, and line together.
- Reel: A small fixed spool reel (2000-3000 size) already loaded with 4-6lb monofilament line.
- Spare spool: Not essential for a first session but useful later.
Float Tackle
- Floats: 3-4 small waggler or straight-bodied floats (carrying 2-4 BB shot). Your local tackle shop can advise on what suits the water you intend to fish.
- Shot: A range of shot sizes – BB, AAA, No.4, No.6. A mixed shot dispenser is the simplest option.
- Swivels: Size 12-14 micro swivels (used to attach hooklinks to the mainline).
- Hooklinks: Pre-tied hooks to nylon in sizes 16-20 on 3-4lb line are the easiest starting point for beginners. A packet of size 16 and a packet of size 18 covers most situations.
Unhooking and Fish Care
- Disgorger: A small plastic or metal disgorger removes hooks from the mouth of small fish without hurting them or the fish. Essential. Get one before you fish.
- Landing net: A small-to-medium pan net (36-42 inch frame, fine mesh). You will need this to land any fish over about 6 inches. Check fishery rules – many commercial fisheries require a net.
- Unhooking mat: Required at carp fisheries; less critical for general float fishing. If targeting carp, bring one.
- Bucket or keepnet (optional): A keepnet allows you to retain fish during the session and return them together at the end. Check fishery rules – some venues restrict keepnets. For a first session, catch-and-return each fish immediately is simpler.
Other Essentials
- Rod rest or bankstick: A simple bankstick with a rod rest cradle holds the rod while you wait for bites. Some beginners hold the rod all day; others prefer the rest.
- Tackle box: A small box or bag to carry shot, hooks, floats, and small items.
- Scissors or nail clippers: For trimming excess line and cutting hooklinks.
- Marker pen: For marking your rod to clip up at distance (not needed on a first session).
Bait Checklist
Essential Baits for a First Session
- Maggots: The most versatile and widely used bait in UK coarse fishing. Buy from a tackle shop on the morning of your session – fresh maggots are more active and more attractive to fish. A half-pint is enough for a 3-4 hour session on a commercial fishery.
- Sweetcorn: A tin of sweetcorn from any supermarket. Works on most commercial fisheries, particularly for carp, tench, and bream. Thread a single grain on a size 14-16 hook.
- Bread: A slice of fresh white bread. Tear off a small piece of bread flake and squeeze the top onto the hook shank, leaving the rest fluffy. Works for roach, perch, and carp.
Optional Extras
- Worms: Dendrobena worms (smaller than a lobworm) are sold in tackle shops and work well for perch, roach, and chub. A quarter-pint of maggots plus a handful of dendrobenas covers most situations.
- Pellets: Pre-bagged hook pellets (6-8mm or 10-14mm) work on commercial carp fisheries where fish are pellet-accustomed.
On the Day: At the Fishery
Arrival
- Park properly and check in. Pay your day ticket at the office if not done online.
- Ask the bailiff or fishery staff: Where are the fish being caught? Which swims are productive today? What bait is working? A five-minute conversation with a bailiff is worth an hour of reading.
- Walk the bank first before setting up. Even at a familiar venue, walking to see where fish are showing (surface activity, coloured water) before committing to a swim is worth doing.
- Choose a suitable swim. For a first session, avoid pegs with overhanging branches directly above you or to the side. A clear, open swim with plenty of casting room is the safest start.
Setting Up
- Set the rod and reel before threading line.
- Thread the line from bottom guide ring upward to the tip.
- Tie the float to the line using a float rubber (top and bottom for a stick float; bottom only for a waggler).
- Add shot below the float: Use the guidance on the float packaging – if the float is rated 3BB, add 3BB of split shot spaced along the line below the float.
- Tie or attach the hooklink: Use a loop-to-loop connection between hooklink swivel and the main line loop, or tie directly. Pre-tied hooks to nylon eliminate the knot-tying requirement for a first session.
- Plumb the depth: Use a plummet clipped to the hook to touch the bottom and find the exact depth of the swim. Set the float so the hook is 2-4 inches above the bottom to begin.
Fishing
- Cast softly. An overarm cast on a float rod should be smooth, not a powerful swing. The float and shot do the work.
- Feed little and often. Introduce 5-8 maggots by hand every few minutes to attract and hold fish.
- Wait for a clear bite. The float will dip, slide under, or move sideways when a fish takes the bait. Strike with a smooth sideways movement of the rod rather than a sharp overhead strike.
- Land fish carefully. Net the fish by placing the net in the water and drawing the fish over it (not chasing the fish with the net). Lift once the fish is over the net.
- Remove the hook with a disgorger or forceps and return the fish gently to the water.
What to Wear and Bring
- Waterproof jacket: UK weather is unpredictable. A waterproof outer layer is essential even on forecast-dry days.
- Warm layers under: Even in summer, time spent sitting still by a lake is colder than expected.
- Sunscreen and hat in summer.
- Water and food: A day session with no food or drink is miserable. Bring more than you think you need.
- Phone (charged): For emergencies and for photographing any fish caught.
- First aid kit: A basic kit for cuts and scrapes.
Frequently Asked Questions
What is the minimum equipment I need for a first fishing session?
The legal minimum is a rod licence (or confirmation you are under 13). The practical minimum is a rod, reel with line, a float, some shot, a hook, a disgorger, and bait (maggots or bread). A landing net is strongly advised for any fish over 6 inches. Everything else is optional for a first session.
Can I fish without a licence?
Not in England and Wales if you are aged 13 or over. A rod licence is a legal requirement. It can be bought online at gov.uk/fishing-licences on the morning of the session. A 1-day licence is the cheapest option for a first session.
What is the best venue for a first fishing session?
A commercial coarse fishery with regular stocking of small to medium carp, roach, and bream, on-site bailiff, toilets, and easy bank access. These venues are specifically designed for beginners and typically have helpful staff and plenty of fish. Avoid wild rivers for a first session – access, fish location, and conditions are all harder to manage without experience.
Do I need a keepnet?
Not for a first session. Simply return each fish to the water after unhooking and photographing it. Keepnets require correct setup to avoid harm to fish, and many commercial fisheries have keepnet restrictions. Catch-and-return is simpler and kinder for a first session.
What time should I arrive for a morning fishing session?
For a half-day or full day session, arriving at 7-8am gives you the most productive time of day (dawn feeding activity) while avoiding very early darkness. In summer, fish are most active at dawn and dusk; in winter, midday is often more productive than early morning. Check the fishery opening time before planning your arrival.
← Back to From the Bank – UK Fishing Articles, Tips and Stories