The knotless knot is the most widely used rig-tying method in carp fishing. It creates both the hair (the length of line below the hook that holds the bait) and the hooklink attachment in a single sequence, without a separate knot joining them. The result is a neat, strong, reliable presentation with the hair emerging from the back of the hook at a controlled length.
Every carp angler needs to be able to tie a knotless knot efficiently and confidently. Once learned, it takes about thirty seconds and produces consistent results.
What You Need
- Hooklink material: 20-25cm of 10-15lb coated or uncoated braid, or soft mono (8-12lb)
- Hook: size 6-10 wide-gape carp hook (size 6-8 for boilies 15-20mm, size 8-10 for smaller baits)
- Bait stop: a small piece of silicon tubing, a plastic bait stop, or a short piece of the hooklink itself tied as a loop
- Needle tool (bait needle) for mounting the bait onto the hair
- Scissors for trimming
Understanding the Hair Length
The “hair” is the section of hooklink that extends below the hook bend and holds the bait. Hair length affects how the rig behaves when a carp mouths the bait:
Short hair (1-2cm): Bait sits very close to the hook. Suited to harder baits (hard boilies, pellets) and methods where a tight presentation is needed.
Medium hair (2-3cm): Standard hair length for 15-18mm boilies on a size 8 hook. This is the default starting point for most carp fishing.
Long hair (3-5cm): Used for stacking two boilies on the hair (snowman rig), for larger baits, or for pop-up presentations where the buoyant bait needs more space to align correctly.
The hair should be long enough that the bait hangs away from the hook naturally, but not so long that the bait and hook behave as completely independent units.
How to Tie a Knotless Knot Hair Rig: Step by Step
Step 1: Cut the hooklink Cut 20-25cm of hooklink material. This gives enough to work with; the finished hooklink length can be adjusted later.
Step 2: Tie the bait stop and create the hair loop At one end of the hooklink, tie a small overhand loop (leave a tag of 2-3cm). The loop is what the bait needle will pass through to mount the bait. Thread a bait stop onto the tag end below the loop to prevent the bait sliding off. Alternatively, use a commercial silicon bait stop rather than tying a loop.
Step 3: Determine the hair length Hold the hook alongside the hooklink with the bend of the hook at the position where you want the bait to sit. Mark or pinch the hooklink at the eye of the hook – this is where the wraps will begin. The length of hooklink below that pinch point (down to the hair loop) is your hair length. For a standard 2-3cm hair with a size 8 hook and 18mm boilie, the hair loop should sit approximately 2-3cm below the hook bend.
Step 4: Pass the hooklink through the eye Pass the hooklink (from the bait stop end upward) through the hook eye from the inside out (from the point side of the hook through to the back of the eye). This is important: the hooklink must pass through the eye in the correct direction for the rig to fish correctly.
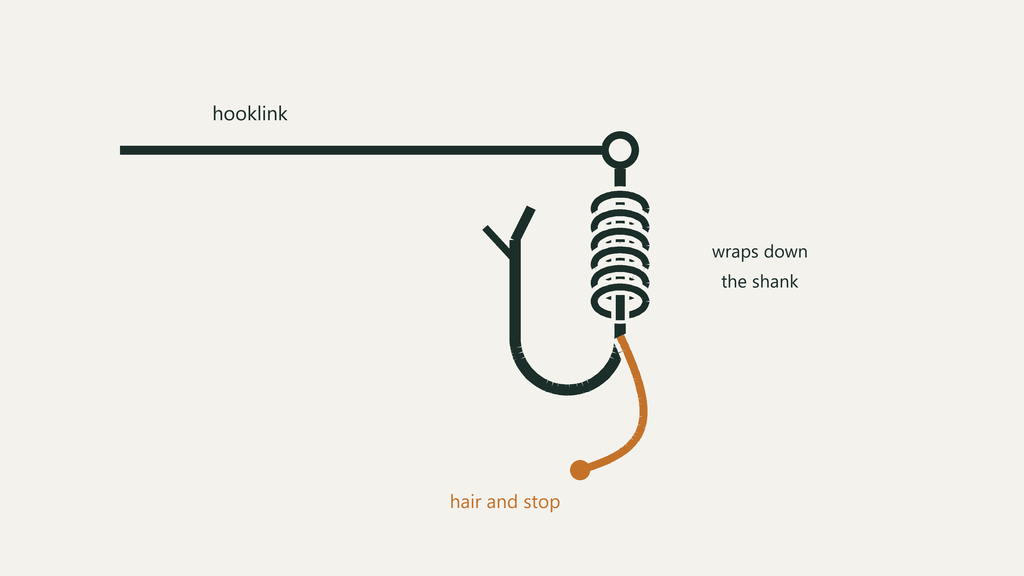
Step 5: Begin the wraps Hold the hook and the hooklink firmly, keeping the hair length correct. With the free end of the hooklink, begin wrapping back down the hook shank toward the bend, keeping each wrap lying parallel to the previous one. Maintain consistent tension throughout.
Step 6: Complete 8-10 wraps Continue wrapping down the shank for 8-10 turns, working toward the bend. The wraps should lie flat and parallel against the hook shank, with no crossing or bunching. The hair should emerge from the bottom of the final wrap, close to the bend.
Step 7: Pass the hooklink back through the eye When the wraps are complete, pass the free end of the hooklink (the top end, not the hair end) back through the hook eye from the outside in – in the opposite direction to Step 4. Pull through firmly.
Step 8: Pull down and seat the wraps Pull the free end of the hooklink and the hair end in opposite directions simultaneously to seat the wraps. They should tighten evenly down the shank with no gaps or crossings.
Step 9: Attach to the mainline or lead setup The free end of the hooklink can now be tied to a swivel or lead clip with a Grinner or blood knot.
Checking the Rig
Once tied, check: – The hair exits cleanly from the underside of the shank, near the bend – The wraps are parallel and even – The bait stop is secure on the hair – The hooklink enters and exits the hook eye cleanly with no hinging
A correctly tied knotless knot should hold the hair at a consistent angle below the bend, aligned so that a boilie mounted on the hair sits directly below the hook.
Mounting a Boilie on the Hair
- Thread a boilie onto the bait needle (push the needle point through the boilie so it threads onto the shaft)
- Slide the hair loop onto the needle hook
- Pull the bait needle back through the boilie, pulling the hair loop through
- Place the bait stop through the hair loop so the boilie is held securely against it
The boilie should hang freely on the hair with the bait stop securing it from below. It should not be jammed tight against the hook bend – a small gap between the boilie and bend improves presentation and hook-up rate.
Hooklink Material Choices
Uncoated braid: The most flexible option. Highly supple, allowing the hook to move naturally. Best for short hooklinks (10-15cm) in clear water where natural presentation is critical.
Coated braid (stripped back): The most popular choice. A layer of coating is stripped back from the final 3-5cm near the hook, creating a supple section near the hook while the body of the hooklink is stiffer and more anti-tangle. Easy to work with for the knotless knot.
Monofilament: Stiffer than braid and sits naturally on the bottom without curling. A mono hooklink of 8-12lb is effective for pop-up rigs and in situations where braid is too obvious in clear water.
Fluorocarbon: Nearly invisible in water, stiffer than mono. Used in clear water situations where line visibility is a concern.
Common Mistakes
Hair exits from the wrong position. If the hair exits from the top of the shank rather than near the bend, the hooklink was passed through the eye in the wrong direction in Step 4. Untie and restart – check the direction before beginning the wraps.
Wraps cross or bunch. Usually caused by insufficient tension during wrapping. Hold the hook and hooklink firmly throughout.
Hair length is inconsistent. Caused by not establishing the hair length precisely before beginning the wraps. Take time at Step 3 to check the length before committing.
Too few wraps. Fewer than 8 wraps increases the chance of the hooklink pulling through under load. 8-10 wraps is the minimum for safe carp fishing applications.
Variations
Snowman rig: Two boilies on the hair – one standard bottom bait and one smaller pop-up above it. The pop-up buoyancy lifts the nose of the rig, improving the hooking angle when a carp picks up the bait.
Pop-up rig: A buoyant boilie fished above the lead on a short rig. The knotless knot is used but the hair angle is often adjusted (a bent hook shank or rig tube alters the hooking angle for upward-rising fish).
Ronnie (spinner) rig: A swivel is tied to the eye of the hook with the knotless knot, allowing the hook to rotate on the swivel. Used specifically for pop-up presentations. Variations of the knotless knot technique apply.
Frequently Asked Questions
Why is it called the knotless knot?
Because the wraps holding the hooklink to the hook are not a conventional knot – there is no tying of a knot per se. The wraps are held in place by the hooklink passing back through the eye at the end, trapping the wraps against themselves. This avoids the weak point that a conventional knot creates at the eye.
How many wraps should a knotless knot have?
Eight to ten wraps is the standard. Fewer wraps reduce strength; more wraps can cause bunching on smaller hooks. On a size 6 hook with a standard gauge braid, 8 wraps is typical. On a size 8, 9-10 wraps may be used to fill the shorter shank.
Can I use a knotless knot with monofilament?
Yes. The knotless knot works with monofilament as well as braid. Mono is stiffer, which makes wrapping slightly harder on small hooks, but the technique is the same. Wet the wraps before seating.
What is the strength of a knotless knot?
A correctly tied knotless knot retains close to 100% of the hooklink’s rated breaking strain, which is one reason it has become the dominant carp rig-tying method. The wraps distribute load evenly along the shank rather than concentrating it at a knot point.
Do I need a bait needle to mount a boilie?
Yes. A bait needle (also called a boilie needle) is the standard tool for threading boilies onto the hair. The needle pulls the hair loop through the boilie so the bait stop can be positioned. Without a needle, mounting a boilie cleanly on the hair is very difficult.