The grinner knot – also called the uni knot in North American fishing – is one of the most reliable, versatile knots in coarse and sea fishing. Many experienced UK anglers rate it above the improved clinch knot for lines above 8lb, and it is equally at home on monofilament, fluorocarbon, and (with the right modifications) braid.
It is used for: attaching hooks to monofilament or fluorocarbon hook lengths, connecting line to swivels and clips, joining two lines of equal or unequal diameter (double grinner or back-to-back uni), and as the foundation knot in several more complex rig connections.
What You Need
- Monofilament or fluorocarbon line (the grinner works on both; see braid note below)
- Hook, swivel, or clip with a reasonably sized eye
- A pair of scissors or line cutters
- Water or saliva to lubricate the knot before tightening
The grinner does not work reliably on standard braid because the slick surface allows the wraps to slip under load. Use a Palomar knot for direct braid connections.
How to Tie the Grinner Knot
Step 1. Thread 6-8 inches (15-20cm) of line through the hook eye from the point side toward you, leaving a long enough tag end to wrap comfortably.
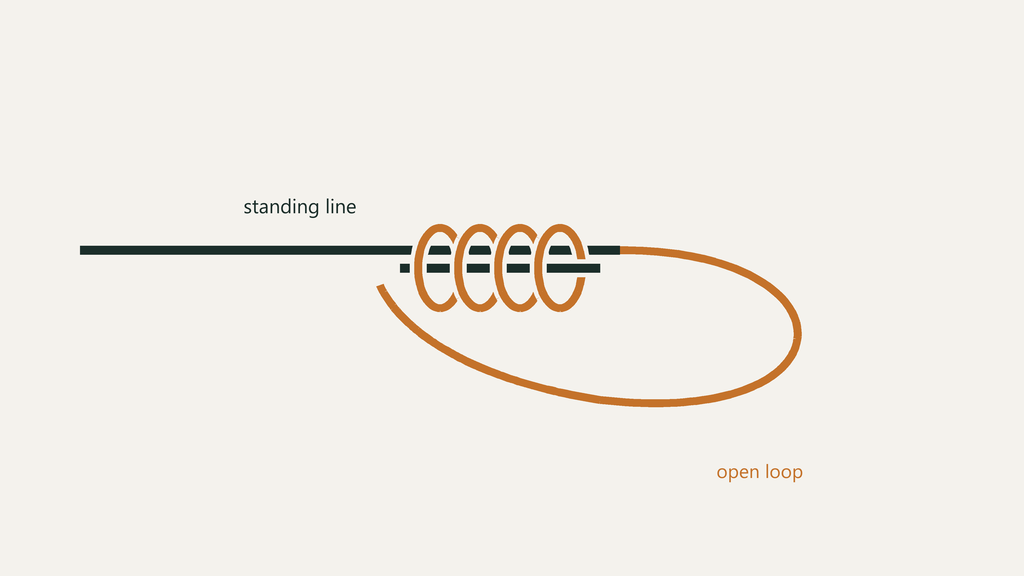
Step 2. Double the tag end back alongside the standing line to create a long loop (the loop should extend 5-6 inches from the hook eye). The loop and the standing line run parallel.
Step 3. Hold the loop and both parallel sections of line together between thumb and forefinger, leaving a 4-5 inch working section of the tag end free.
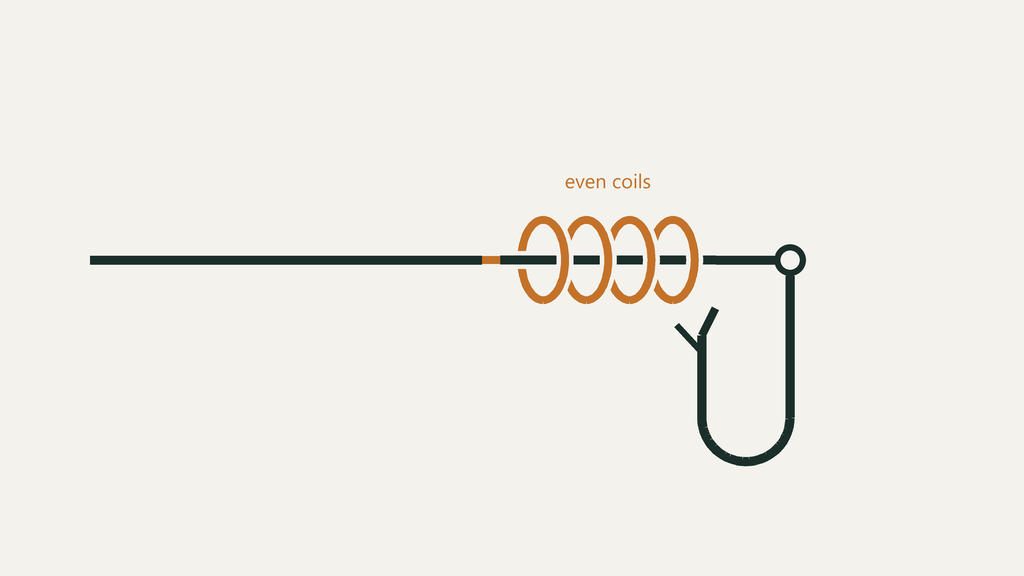
Step 4. Pass the tag end over the loop and standing line combined, and begin wrapping it around both the loop and the standing line. Wrap back toward the hook eye, making 5 or 6 turns (5 turns for lines 10lb and above; 6 turns for finer lines under 8lb).
Step 5. Bring the tag end through the loop created by the turn-wrapping. The loop tightens as you do this – keep tension on both the standing line and the tag end to maintain the structure of the wraps.
Step 6. Moisten the knot with saliva or water. Pull the standing line away from the hook steadily, drawing the knot toward the hook eye. The wraps should seat evenly and tighten against the hook eye as you pull. If any wraps cross over, start again.
Step 7. Once the knot is seated against the hook eye, pull firmly on the standing line while holding the tag end to lock the knot fully. The knot should feel solid with no slippage.
Step 8. Trim the tag end to within 2-3mm of the knot. Do not cut too close – the tag provides a small margin against the knot slipping under sudden load.
How Many Turns?
The number of turns affects the knot’s grip and reliability:
- Lines under 6lb: 6-7 turns
- Lines 6-15lb: 5-6 turns
- Lines over 15lb: 4-5 turns
More turns do not always mean a stronger knot. On heavy line, too many turns produce a bulky, uneven knot that does not seat properly. On fine line, too few turns allow slippage. Match the turn count to the line breaking strain.
Grinner Knot Strength
A correctly tied grinner knot retains approximately 80-90% of the line’s rated breaking strain. The exact figure depends on line type, diameter, and how well the knot was tied. Monofilament grinners typically achieve 85-90%; fluorocarbon grinners achieve 80-85% (fluorocarbon is stiffer and slightly harder to seat evenly).
Tying dry, crossing wraps, or pulling too fast all reduce knot strength significantly. Moisten, pull slowly, and check for even wraps every time.
When to Use the Grinner Knot
Hooks to hook length: The grinner is excellent for attaching hooks to monofilament or fluorocarbon hook lengths of any diameter. It is particularly preferred over the improved clinch on lines above 8lb where the clinch becomes less reliable.
Swivels and clips: Tie a grinner directly to a swivel eye for a reliable, neat connection. The knot lies cleanly against the swivel without the slight bulk of an improved clinch.
Heavy wire traces: The grinner can be used to attach heavy monofilament or fluorocarbon leaders to swivels and pike traces. For lines above 30lb, use 4 turns and ensure the knot is seated very firmly.
The Double Grinner (Joining Two Lines)
Two grinner knots tied back-to-back join two lines of equal or unequal breaking strain. This is the standard connection between mainline and leader on many sea fishing and carp setups:
- Lay the two lines alongside each other with 6 inches of overlap.
- Tie a grinner in one line around the other, with 5-6 turns.
- Slide this knot halfway down the overlap but do not lock it yet.
- Repeat with the other line, tying a second grinner in the second line around the first, in the opposite direction.
- Moisten both knots, hold both tag ends, and pull the two standing lines apart steadily.
- The two grinners slide together, seat against each other, and lock. Trim both tag ends.
The double grinner produces a slim, streamlined join that passes easily through rod rings and is reliable to around 85% of the weaker line’s breaking strain.
Common Mistakes
Not pulling the loop tight enough in step 5. If the loop is not properly maintained during the early steps, the wraps tangle when you try to pull the knot tight. Keep a light tension on the loop throughout.
Crossing wraps. Check the wraps are laying flat and parallel before pulling tight. If any wraps cross over, start again – a knot with crossed wraps has significantly reduced strength.
Pulling too fast. The friction of a fast pull heats the line and damages it before the knot is fully seated. Pull steadily.
Cutting the tag too short. Leave 2-3mm of tag. Cutting flush with the knot risks the tag pulling back through under load.
Grinner vs Improved Clinch: Which to Use?
Both knots are reliable on monofilament in the 4-20lb range. General guidance:
- Under 6lb: Both work well. The improved clinch is faster to tie; use whichever you can tie more reliably.
- 6-15lb: Either is fine. Many anglers prefer the grinner in this range for its consistent strength.
- Over 15lb: The grinner is generally preferred. The improved clinch on very heavy monofilament can be difficult to seat properly; the grinner’s more controlled wrapping allows better seating.
Both knots fail if tied carelessly. A correctly tied improved clinch is stronger than a poorly tied grinner, and vice versa. Practise whichever you use until you can tie it consistently without looking.
Frequently Asked Questions
How strong is the grinner knot?
A correctly tied grinner on monofilament retains approximately 85-90% of the line’s rated breaking strain. Fluorocarbon grinners achieve approximately 80-85%. Tying dry, crossing wraps, or pulling too quickly all reduce this significantly.
Can I use a grinner knot on braid?
No. The grinner knot does not grip reliably on braid – the slick surface of modern braided lines allows the wraps to slip under sudden load. Use a Palomar knot for direct braid-to-hook or braid-to-swivel connections.
What is the difference between a grinner knot and a uni knot?
They are the same knot. The term “uni knot” is more common in North American fishing literature; “grinner knot” is the standard UK term. Some anglers use “grinner” specifically for the single attachment version and “double grinner” for the line-joining version.
How many turns for a grinner knot with fluorocarbon?
Use 6 turns on fluorocarbon lines under 10lb; 5 turns on 10-20lb; 4 turns on heavier fluorocarbon. Fluorocarbon is stiffer and more difficult to seat evenly than monofilament, so extra care and lubrication are particularly important.
Is the grinner knot good for sea fishing?
Yes. The grinner (or uni knot) is widely used in sea fishing for attaching hooks and clips to monofilament and fluorocarbon leaders. The double grinner is a standard method for joining mainline to leader on sea fishing rigs. For braid mainlines, use a different knot (Palomar or San Diego jam) for direct connections.